Complete Image Styles & Effects
- Last Update
- 25 October 2012
- Regular License
- $8
- Sales
- 29
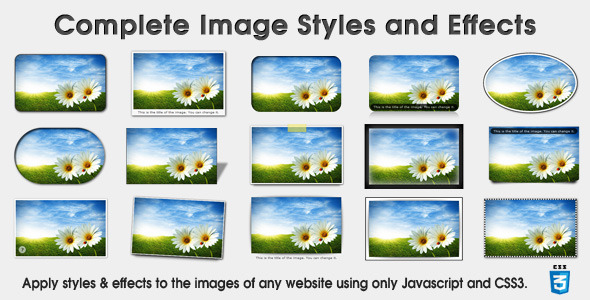
This tool creates impressive styles and effects for the images of any website using only CSS3 and Javascript (jQuery). It supports many styles and effects which most of them can be combined. The combinations are hundreds! Using the editor you can easily compose and test your styles. Then, you export the files containing the code that produces these styles and include them in your website. Finally, you apply the styles to the images by simply adding to them the correct CSS class name. Supported Styles & Effects The following styles and effects are supported. The most of them can be combined but there are some of them that can’t work together. So, activate your styles step by step and test each time if the result is nice and if it is working correctly.
Border Cutout Curled Corners Double Outlined Embossed External Caption Float Framed Glossy Overlay Glowing Horizontal Curve Internal Caption Lifted Corners Margin Opacity Perspective Pop Raised Box Reflection Rotation Rounded Corners Round Image Shadow Shake Size Sliding Caption Tape Tooltip Vertical Curve Transition
This tool includes 18 premade styles/effects that can be used by you. How it works This tool includes an editor which helps you to create and test the image styles and effects you desire. Using this editor you avoid the need of programming knowledge. Below you can see two screenshots of the editor.
The combination of styles and effects form a “view”. You can create as many views as you want. Each view can be applied to the images of your website. The name of the view is the CSS class name that will be added to the image in order to be stylized. After you have finished with the views, the editor creates one CSS file and two Javascript files that will be included in your website. (If your site does not load jQuery then you will also get the jQuery file from the editor.) Then you apply the created styles to your images using the class attribute of each image. As said before, the name of the view is the CSS class name that will be added to the image. For example, the image HTML code <img src="images/project.jpg"> will be done <img src="images/project.jpg" class="my-style-1">. No advanced programming knowledge is needed, only simple HTML. You only need to be careful when you include the necessary files to your website but there is help documentation about this. What this tool includes Downloading this tool you receive a zip file (775 KB) containing only common file types (html, css, js, jpg, png and txt). Among these files the ones you are going to use are the following:
editor.html: This is the main file. This is the editor that creates the styles and effects for the images. help.html: Help documentation about how to use the editor and how to apply the styles and effects to the images of your website. demos.html: A collection of ready made styles and effects just to show the capabilities of this tool. Also you can use them in your website. demos.txt: Saved data of the demo styles and effects to load them in the editor and modify them or directly use them.
Also the following items will be included in your website.
cisae.js: Already created file and ready to be used. cisae.css: Will be created by the editor. Javacscript code: A few lines of Javascript code that will be created by the editor.
Caution
The styles and effects can’t be applied to images on which other complex CSS styles are applied or Javascript code manipulates them. You can’t apply more than one view to the same image. This tool can work with Joomla and WordPress.
Trial The trial version of Complete Image Styles and Effects does not support all the styles and effects but only a few of them. Except this limitation, the rest of the tool is normally working, so you can make a real test of it and be sure it suits your needs.
More information about this tool